SceneExplorer
This page allows precise review of a Participant's Session and is often referred to by customers as an after-action-review (AAR). You can step through a complete recording of the Scene, pausing and investigating everything from Events and Dynamics to Fixations and Sensors.
Controls
The Free Look Camera (default) will rotate the camera with the left mouse button, pan with the right button and zoom with the scroll wheel. The arrow (or WASD) keys will move the camera forward and backward and left and right. You can use the arrows to raise and lower the camera.
Alternate camera modes can be chosen in the bottom right.
Follow User will disable most controls and focus the camera on the selected Participant. Left Mouse button will orbit the camera around the target and the scroll wheel will zoom.
First Person Camera will disable all camera controls and put the camera in the Point of View of the Participant.
Dynamic Objects
You can click on a Dynamic Object in the 3D view to examine metrics about that Dynamic Object. This will set the camera to focus on the selected Dynamic Object - Left Mouse button will orbit the camera. You can press the Back to Scene View button to return the scene camera to the previous position.
Custom Events
Custom Events are displayed as billboard icons in the Scene. They are visible if the Current Replay Timer has passed the time the Event was recorded in the Session. They will be displayed in the position they were recorded.
You can click on an Event to see the Event Name and the properties. If there are multiple Events at the same position, a menu appears in the bottom right to display all nearby Events.
Options

User Menu
This drop down menu allows you to view other Participant Sessions.
- The Search Box allows you to search by a Session's name
- Refresh Session List will refresh the list of all Sessions in the Scene
- Collapse and Expand will control the groups of recent Sessions
- Sessions are grouped into days. You can expand these with the arrow
- A number of Sessions can be enabled from this list with the checkbox
- Activate Selected Sessions will load those Session data into SceneExplorer
Gaze Menu
These are the options for displaying where the Participant looked.
- Mode toggles between Gaze and Fixation (if Fixations have been recorded)
- Visible toggles the visibility of the Gaze or Fixation data
- Gaze Display displays the Gaze or Fixation from the HMD to the world as a Cone or Line
- Show Line toggles the visibility of this Gaze Display
Fixations display a Sphere representing the Fixation Point (the radius shows the fixation size assuming a 1 degree Fixation Radius) and a trail showing recent eye movements.
- Trail Width controls the width of the line displaying eye movements
- Trail Length controls how many points of eye movement data are displayed at once
Gaze displays an approximate heatmap from Gaze data. As the radius between Gaze data overlaps, the Heatmap will use Yellow and Red Colours.
- Heatmap Size controls the radius from a Gaze Point that is required to display the heatmap
- Heatmap Intensity controls the falloff from the position of the Gaze Data
Path Menu
This has options for displaying the Participant's position through the scene.
- Path Type will change if the position is represented at the HMD position or represented at the Participant's feet
- Visible toggles the visibility of the participant's path
- Path Weight increases the width of the line that draws the Participant's path
Events Menu
These enable showing/hiding Events:
- Visible enables the visibility of all Events
- Size changes the size of all Events
- The Search Box and list of Events allow specific visibility controls, configuring icons for display and icon colour
Advanced Menu
There are several options here:
- Scene Version allows you to view different versions of this scene.
- Toggle Name Plates displays the Participant's name overhead. This can be useful when you are viewing several Participants at once
- Post Processing adds anti-aliasing and ambient occlusion
- Light Intensity adds uniform ambient light to the scene. Setting this to 0% will use only the lights exported with the scene geometry
- 3D Grid places a grid on the horizontal plane
- Save Scene Settings saves Gaze, Path, Event and Advanced settings and the current camera position as default
- Clear Scene Cache Clears the locally saved cache files. The local cache reduces the time to load the scene
- Scene Debug Info shows information about how the scene was configured and the dynamic objects
Share Menu
This will create a link to this Session and save the camera position and time.
Help Menu
Displays the controls for the Free Look Camera.
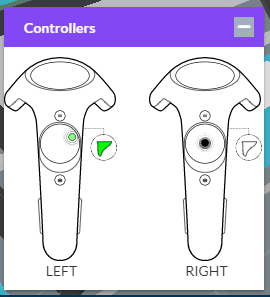
Controllers
If controllers are configured in the SDK, the Participant's inputs are recorded and displayed in the bottom left. When a button is pressed it will appear green. If the input is a range (such as a trigger) the strength of the input is shown as the saturation of the green colour.
Playback Controls

Playback speed
Along the bottom of the window is a timeline. The left side is the beginning of the Session, and the right side is the end of the Session. In the bottom left there are controls to replay the Session at normal speed, double speed and triple speed. Spacebar will pause and continue the replay.
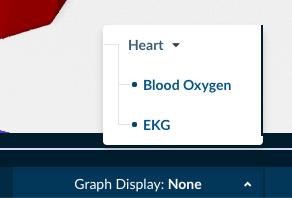
Sensors
In the bottom right, you can select a Sensor to display as a graph. The graph will display the Sensor values along the bottom. You can scale the Sensor values with this slider.
From the SDK, you can add namespaces for your different sensors. For example, multiple heart related sensors attached to your Participant, you could nest them under the "Heart" namespace by adding a period between the parent and child elements. See Unity or Unreal for details.
Camera Options
You can select alternate camera control options from the menu in the bottom right.
Example Use Case - Consumer Product Positioning
Let's say you have a study for a consumer product. The packaging performs well in isolation against a competing brand, but it performs poorly in a immersive store environment. You examine the Dynamic Object metrics and determine the Gaze Sequence value is higher than the competitor - the consumer looks at your product first. But unlike the isolated test, few people are actually purchasing the product.
- Open SceneExplorer with a Session that does not buy the product
- Select First Person Camera to replay what they experienced
- Notice the user gazes at the product first, but doesn't take it from the shelf. It's possible that it is too high to reach comfortably, or doesn't have the same appeal as an eye-level product
- You click on the Dynamic Object and examine the packaging. You realize the product is to relieve back pain, so reaching may be uncomfortable for the consumer.
A possible actionable result is to place the product at an eye-level shelf in the simulation and organize another focus group. Do the sales of your product justify this more expensive shelf space?
Not all immersive studies are created equal. Spending time and resources to accurately replicate environments and experiences can reduce inaccurate projections.
Example Use Case - Training Convenience
Let's say you are training employees with immersive content, then in the real-world to compare results. You notice an immediate dip in success and completion time when transitioning from immersive content to the real world. You determine this immersive training may not be cost effective if the employee must still do real-world training.
- Open SceneExplorer with a successful Session
- Select Focus Camera and the Participant and replay the Session
- You notice the Participant occasionally turns to grab a tool, but does not move around the space
- Confirm this by enabling Show Paths and Select Floor. There is certainly very little movement
- Open Scene Viewer to view the aggregated positions of Participants. This is a common situation.
- All the tools are presented organized and conveniently to the employee.
Perhaps employees are being guided too nicely through this experience? In the real-world training their tools may not be organized in the same way and often require walking around the space to choose the correct tools. This new real-world requirement might be disrupting their thought process. Maybe try adding 'inconvenience' to the immersive training and comparing the results?
A possible trap in immersive experiences is to design UX too well. Real life is messy and inconvenient - reflecting this in the simulations can prepare the participant with a comparable experience.
Example Use Case - Group Training
You're training a group of employees for a complex repair. The repair requires 3 employees at once - one for safety management, one for electrical fixes and one for mechanical fixes. All groups complete the training, but some perform much faster than others.
- Open SceneExplorer and load a group that performs quickly. Also see LobbyId for details about multiple Participants.
- Position the Free Camera to view all employees at once and replay the Session
- Notice two employees are looking back to the safety manager frequently
- Open the Participants page and review the properties of each employee
- Notice the safety manager has the most hands-on experience and is likely providing instructions for the newer employees
You decide to test this group dynamic for future training sessions. The efficiency of this training might not rely on individual skills, but instead on the leadership.
It is important to remember that training is not a checklist - personal experience and relationships will affect behaviour and understanding.
![]() If you have a question or any feedback about our documentation please use the Intercom button in the lower right corner of any web page.
If you have a question or any feedback about our documentation please use the Intercom button in the lower right corner of any web page.