Ready Room
When evaluating participants in VR for training or consumer research, it is important that they are familiar with VR so they provide usable results. Before putting your participants into your experience, it can be very important to teach them about basic interactions in VR and any specific conventions you use.
Even if a participant is already familiar with other VR experiences, the Ready Room lets you check that both equipment and software is configured correctly. This may include eye tracking calibration, room scale set-up, controller batteries are charged, and IPD is comfortable for the participant.
Each project will need some custom configuration - this is just a template to help you get started faster.
You can add the Ready Room Scene and supporting scripts to your project from the Cognitive3D Samples in the Unity Package Manager window.
Teaching Players
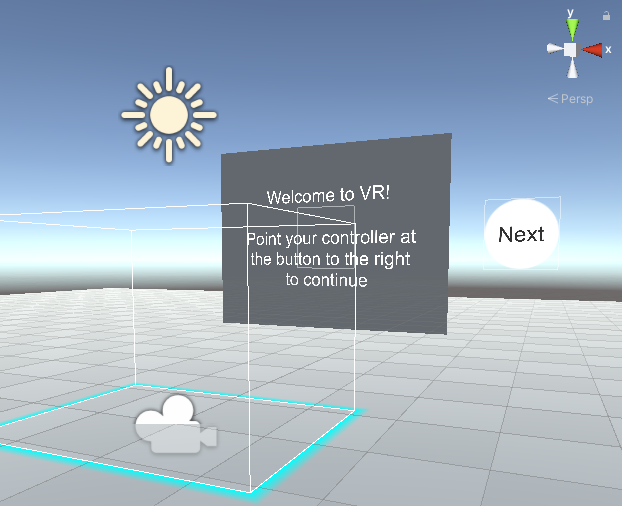
A Good Introduction to VR
Participants new to VR may behave more cautiously and less realistically than they would in a real scenario. The Ready Room gives them an opportunity to 'warm up' and act more naturally in your VR environments.
Especially notable is the convention of how to pick up objects. Each VR controller is slightly different and many VR applications use a different button. Ready Room gives your participants a chance to learn these basic interactions so they don't have to stumble with basic controls while they should be focusing on something more important.
A Basic Introduction to VR
It is equally important not to provide overly thorough instruction to the participant before they get into your experience. For example, if you are doing consumer research testing, putting eye-catching products in this Ready Room scene will diminish the results of seeing these same products in your VR scene. In another example, assessing if a participant can safely use a tool will be invalidated if the Ready Room instructs them with every step.
Setup
Import this sample from the Unity Package Manager. You can find the Ready Room Scene in the Assets/Samples/Cognitive3D Unity SDK folder in your project. The Assessment Manager gameobject has a button to open the Setup Window.
The Ready Room Setup Window will guide you through a basic setup:
- You will be asked to add your player prefab to the scene
- If you are using eye tracking, you will be asked to add any SDK specific prefabs so it can be calibrated and tested
- If you are using room scale and a SteamVR SDK, you will need to add a Play Area component
- If you have objects that the player can grab, then Oculus, Steam and other SDKs will likely require you to add components to those objects
Cognitive 3D Sessions
Since this scene is only to orient your participant in VR, you should not begin a Cognitive3D session in this scene. You do not need to upload this scene to the dashboard.
Assessments
These are the individual tasks a participant must complete to demonstrate familiarity with VR. There are several samples already, but you should add more that are personalized to your experience.
When BeginAssessment is called, each child GameObject is enabled. When CompleteAssessment is called, the child GameObjects are disabled and the next assessment begins.
Example Custom Assessment
Here is a simple Custom Assessment to teach the player how to use a Hammer to strike a nail.
First, here is a script for an example tool that will invoke an event when a collision occurs. Add this script to a GameObject called "Hammer". Add any required scripts to make this grabbable with your selected VR platform.
//HammerTool.cs
using System.Collections;
using System.Collections.Generic;
using UnityEngine;

[RequireComponent(typeof(BoxCollider))]
[RequireComponent(typeof(Rigidbody))]
public class HammerTool : MonoBehaviour
{
    public delegate void HammerEvent(GameObject hit);
    public HammerEvent HammerImpact;

    void OnCollisionEnter(Collision c)
    {
        if (c.relativeVelocity.magnitude > 2)
        {
            if (HammerImpact != null)
                HammerImpact.Invoke(c.collider.gameObject);
        }
    }
}
Second, create a GameObject and call it "Custom Tool Assessment". All the pieces needed to explain and complete the assessment will be child GameObjects. These child GameObjects will be enabled only when the assessment is active.
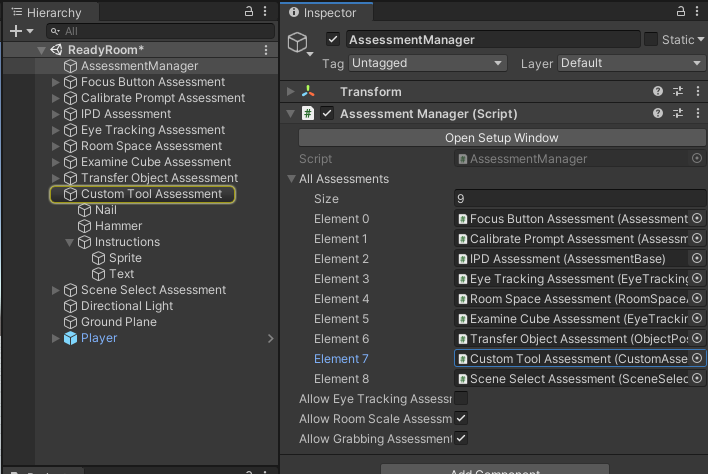
Third, create a new script that inherits from AssessmentBase. This will hold some simple logic to determine when this tool is used successfully. Then add this script to your "Custom Tool Assessment" GameObject and drag the "Hammer" GameObject to the Hammer field, and a new GameObject to the Nail field.
using System.Collections;
using System.Collections.Generic;
using UnityEngine;
using Cognitive3D;

public class CustomToolAssessment : AssessmentBase
{
    //the nail the player must hit to complete this assessment
    public GameObject Nail;
    public HammerTool Hammer;

    //listen for the hammer impact event
    public override void BeginAssessment()
    {
        base.BeginAssessment();
        Hammer.HammerImpact += OnHammerUsed;
    }

    //if the hammer impact hits the nail, complete the assessment
    public void OnHammerUsed(GameObject hit)
    {
        if (hit != Nail) { return; }
        CompleteAssessment();
    }

    //custom cleanup - make sure participant is no longer holding hammer when it is disabled
    public override void CompleteAssessment()
    {
        Hammer.HammerImpact -= OnHammerUsed;

  //you may need to write code to remove the held object from the player's hands
        //Player.Instance.DropHeldItems();
        base.CompleteAssessment();
    }
}
Finally, add this new script to the Assessment Manager's list of All Assessment. The order of this list determines the order in which assessments are displayed.
![]() If you have a question or any feedback about our documentation please use the Intercom button in the lower right corner of any web page.
If you have a question or any feedback about our documentation please use the Intercom button in the lower right corner of any web page.