Dynamic Objects
The Dynamic Object component allows you to track the positions and states of actors during the Participant's Session. These can be used to track controllers, AI characters, interactive objects and even environments.
Currently unsupported
- Visualizing material or texture changes on Dynamic Objects
- Particle Systems
- Skeletal Animations
- Mesh Deformation
Dynamic Object Component
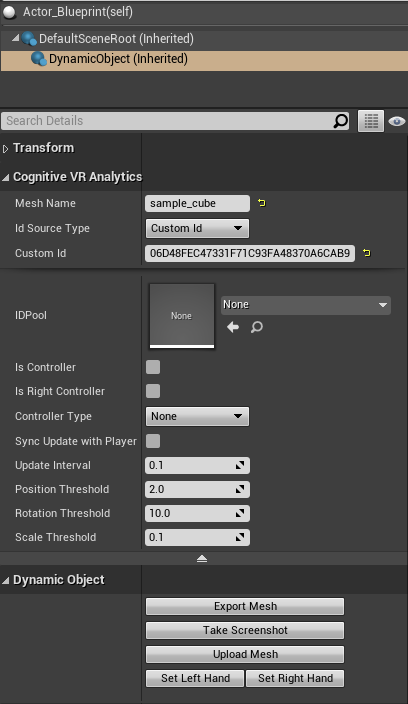
Basic
- Mesh Name - The name of the mesh to represent this actor on Session Replay.
- Id Source Type - Determines how this Dynamic Object is uniquely identified. In most cases, Custom Id is the simplest option.
- Custom Id - This identifies a specific object using a GUID.
Advanced
- Id Pool - This references an asset with an array of GUIDs. See Spawning Dynamic Objects below.
- Is Controller - Indicates if this is a controller
- Is Right Controller - Indicates if this Dynamic Object is the right controller
- Controller Type - Indicates what type of controller should be used to represent this on Session Replay
- Sync Update with Player - Records the transform of the actor at the same time as the HMD transform is recorded. This is useful for objects moving with the player, such as controllers or hats
- Update Interval - This is the delay in seconds before checking if the Actor moved beyond its threshold.
- Position Threshold - Centimeters the Actor must move to record a new snapshot. Checked each Update Interval.
- Rotation Threshold - Degrees the Actor must rotate to record a new snapshot. Checked each Update Interval.
- Scale Threshold - Percent of scale change that must be reached to record a new snapshot. Checked each Update Interval.
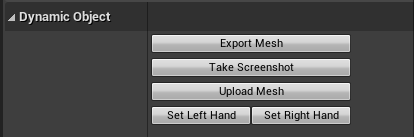
Buttons
- Export Mesh - Export the Static Mesh Component to represent this Actor on Session Replay. Disabled if the Export folder has not been set from the Scene Setup Window or Preferences.
- Take Screenshot - Takes a screenshot from the Unreal viewport to represent this mesh on the Dashboard. This is done automatically but is available if you want to replace the existing image.
- Upload Mesh - Uploads the exported Mesh to the current Level (disabled if the Level has not been uploaded to Session Replay).
- Set Left Hand/Set Right Hand - Configures the advanced settings to identify this Dynamic Object as one of the player's hands. This is used by various Built in Components
Auto-assign dynamic objects
Note
This feature is supported in Cognitive3D Unreal SDK 1.6.0 and above
This feature allows developers to automatically add dynamic object components to any number of actors currently present in the level. This functionality is available in the Dynamic Object Manager window. To use it, simply select the actors in the scene that you wish to add dynamic object components to, and in the Dynamic Object Manager window, press this button:

This looks for any mesh components on the actors selected, and automatically adds a child dynamic object component to it, and initializes the component with the appropriate mesh name based on its parent. If no meshes are present on the actor, it simply adds a dynamic object component to its root component. If there are multiple meshes, each one gets a dynamic object component. And finally, if the appropriate number of dynamic objects is already present (one per mesh), it does nothing.
Controllers
Motion Controllers can be configured to record Participant's controller movements and button inputs. You should see a guide to configuring Dynamic Objects for controllers in the Scene Setup Window, which is expanded below.
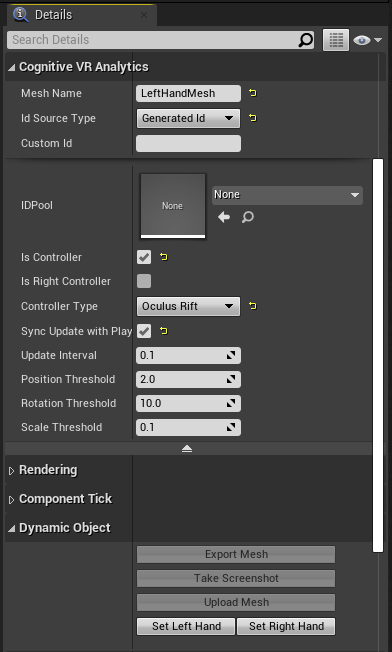
Adding Dynamic Object Components
- Open your VRPawn blueprint
- Add a Dynamic Object component to each controller. These should be attached to each Motion Controller component's child Hand component

- Set the Controller Type property to your expected platform in the Details panel
- Press the Set Left Hand or Set Right Hand button on the component in the Dynamic Object section of the Details panel
Spawning Controllers
If you are spawning controllers from a single Blueprint, such as the VR template from Unreal 4.26, there is an addition configuration setup. This is to set the controllers as 'Left' or 'Right' hand when they have been spawned. Open the Constructor graph for your BP_MotionController and add the following nodes:
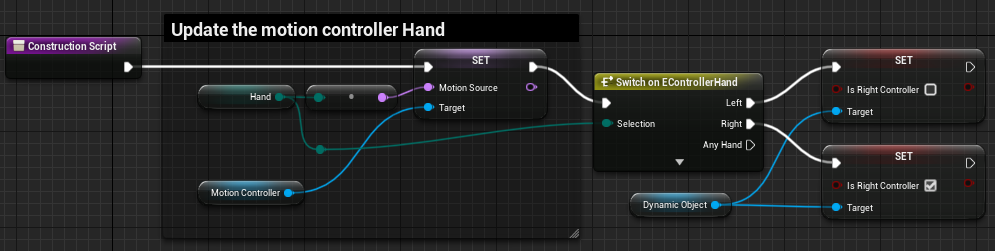
The example above shows how the Hand variable from the MotionController component can be used to set the variable Is Right Controller to true or false on the Dynamic Object Component on this Blueprint.
Controller Button Inputs
Note
As of version 1.5.0, our SDK now supports recording controller inputs for the Enhanced Input plugin
As part of the Scene Setup Window, you will see a button to Append Input Data to Input.ini if you are using the standard input system. This button adds raw input mappings to your input, so we can record and visualize the buttons the participant presses during your experience.
Alternatively, you can add several bindings to your Config/DefaultInput.ini file. Copy this file into your DefaultInput.ini file.
However, if your project uses the Enhanced Input plugin, you will see a prompt mentioning that, and you do not need to do anything else to set it up.

The controllers appear as Dynamic Objects in Session Replay. The Participant's inputs also appear in the popup in the top left corner.

Advanced Dynamic Objects
Spawning Dynamic Objects
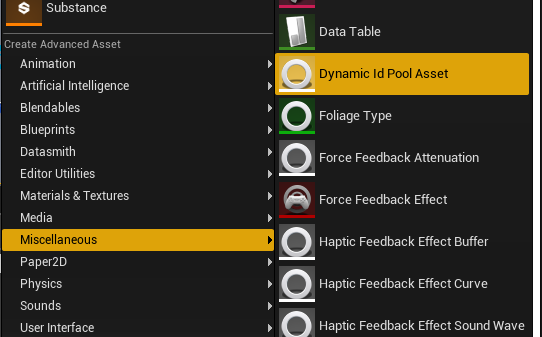
By default, GUIDs are used to uniquely identify the same Dynamic Object across multiple Session. These are set in the Unreal Editor. If you spawn blueprints during runtime, the Custom Id will be incorrect because the same Id will be representing two different objects. In this case, choose Dynamic Object Id Pool. This is an asset that holds a number of GUIDs. When a blueprint is spawned, it takes an unused value from an array on this asset. This allows spawned Dynamic Object to have consistent Ids so data can be aggregated.
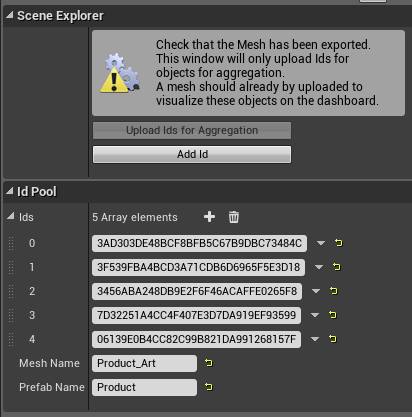
To configure this, first create a Dynamic Id Pool Asset in your project:
Set the Mesh Name. This mesh will be used when visualizing the object in Session Replay or Object Explorer. Make sure you upload the Mesh Geometry to the dashboard. The best method is to add the spawned actor (with the Dynamic Object component) to the level and press the Export and Upload buttons. Then you can delete this actor afterward.
The Prefab Name is displayed as the name of the object in the Dynamic Object gallery view on the Dashboard.
Press Add Id to create a new GUID. When Dynamic Objects are spawned, they take a value from this array. You should include as many as you expect will spawn in the session. If you include too few, some objects will not aggregate data.
Press Upload Ids for Aggregation. This ensures data recorded on these objects is aggregated on the Dashboard.
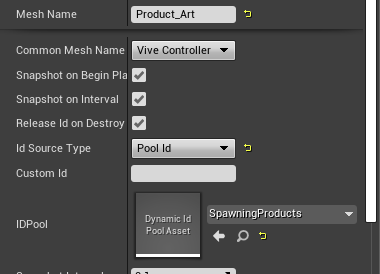
In Unreal's Blueprint Editor, select the Dynamic Object component and select Pool Id from the Id Source Type. Then set the ID Pool property to the asset you created.
Managing Blueprints with Dynamic Objects
Note
This feature is available in Cognitive3D Unreal SDK version 1.7.0 and above
Blueprints that have Dynamic Object components can be tracked in the Dynamic Object Manager Window, similar to the Dynamic Objects in the level. This allows you to track the status of these Blueprint Dynamics, as well as export the mesh and upload it to our dashboard.
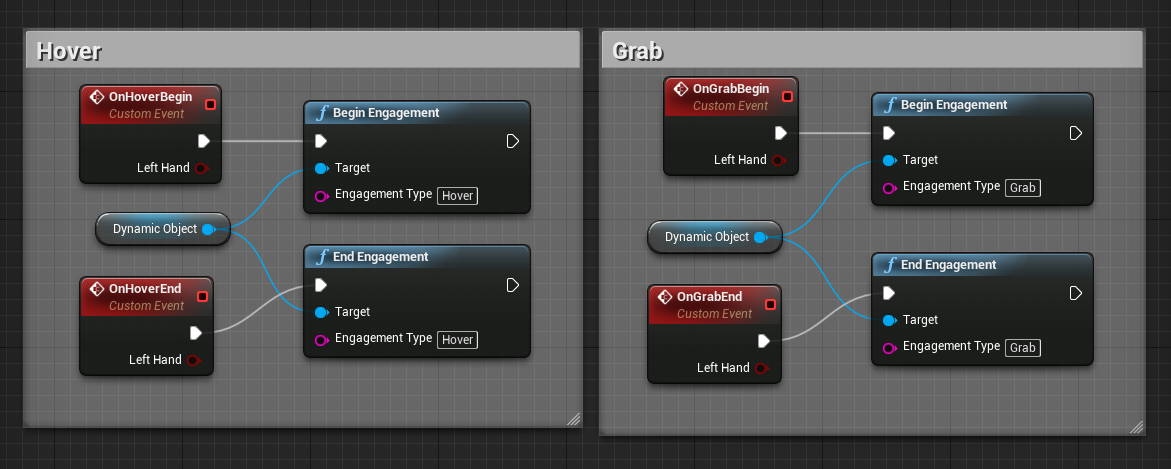
Engagements
Engagements allow you to record precise information about how a participant manipulates the scene. An Engagement could represent a state such as grabbing an Actor, proximity to an Actor, or pointing at an Actor. Internally, these are implemented as Custom Events with this Dynamic Object as the target.
    UDynamicObject* dynamic = AActor::FindComponentByClass<UDynamicObject>();

    UDynamicObject::BeginEngagement(dynamic, "Grab");
    UDynamicObject::EndEngagement(dynamic, "Grab");
Proxy Meshes
Some visual elements in Unreal cannot be easily exported and reconstructed in Session Replay. One example is particle systems. Or you might also have a very detailed model that doesn't need to be rendered in high fidelity on Session Replay. Both of these could benefit from exporting a Proxy Mesh.
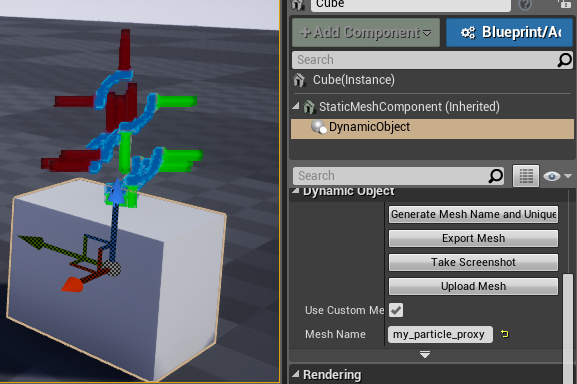
First set up the Dynamic Object you want to represent. Here, we want to record 'my_particle' made from a particle system.
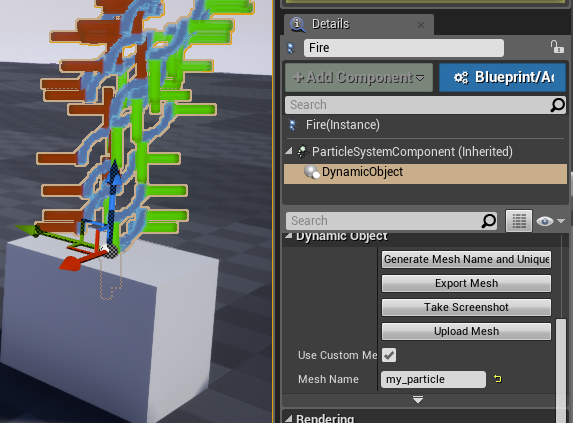
Second, create a Dynamic Object to be the proxy. Then open the proxy Dynamic Object's Advanced Options and press Export Mesh. In this example, the proxy is a red sphere named 'my_particle_proxy'. You can delete the proxy mesh from your scene afterward.
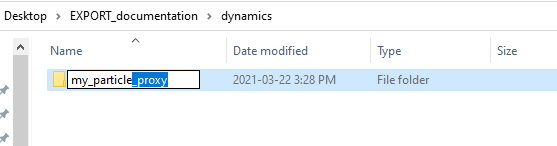
In your Export/dynamic/ folder, rename the folder to match the desired Dynamic Object's Mesh Name. In this example, the folder would be renamed from 'my_particle_proxy' to 'my_particle'. In Unreal, open the desired Dynamic Object's Advanced Options, press Upload Mesh, and you are done!
Multiple Dynamic Objects on one actor
You can track multiple meshes on one actor/pawn individually - simply add multiple dynamic objects to that actor. Each dynamic object component should be a child of the mesh that it is tracking.

Managing Multiple Dynamic Objects on one actor
Note
This feature is available in Cognitive3D Unreal SDK version 1.6.0 and above
When an actor has multiple mesh components, each with their own dynamic object, they are each individually managed in the Dynamic Object Manager window for export and upload functionality.

Session Replay
Dynamic Objects on Session Replay
Each Actor with a Dynamic Object Component needs a visual representation for Session Replay. Each Dynamic Object with a different Mesh Name is uploaded during the Scene Setup. You can add new Dynamic Objects, upload new meshes and replace existing meshes without uploading a New Scene Version.
Uploading Dynamic Meshes - Component
On a Dynamic Object Component, you can automatically or manually set a Mesh Name. Taking a Screenshot from the Unreal Editor Viewport will allow you to quickly identify the Dynamic Object on the Dashboard. This screenshot is shared between all Dynamic Objects with the same Mesh Name. If the Export Mesh button is disabled, you likely need to choose an Export Directory in Preferences.
Uploading Dynamic Meshes - Dynamic Object Manager Window
From the Cognitive3D menu, open the Feature Builder and select the Dynamic Object feature. This window lists all the Dynamic Objects in your level and all the Blueprints in your project that have dynamic object components. The tools support sorting, exporting, and uploading Dynamic Objects to the Dashboard.

The main section lists all Actors with Dynamic Object Components in your currently open level and Blueprints in the project. This displays the Actor or Blueprint Name, Mesh Name, Id and if the Mesh has been exported and if the Id has been uploaded to the dashboard. The dropdown at the top-right shows which tracked-scene these dynamics will be uploaded to. For each item there are also checkboxes that show the exported and uploaded status of every dynamic object in relation to the selected scene.
At the bottom are buttons to Upload Meshes to the Dashboard (this will also prompt you to export the meshes to your temporary folder). Uploading meshes allows the Dynamic Object to be represented in Session Replay and on the Object Explorer page on the Dashboard.
Uploading a mesh will also upload the Id to the level in the dropdown to consistently identify Dynamic Objects across multiple Sessions so data can be aggregated between users.
Occasionally, a warning may be visible indicating that Dynamic Objects are not configured correctly. This may be caused by missing Mesh Names or invalid or duplicated Ids. Press the Validate Mesh Names and Unique Ids button that appears to fix this.
Aggregating Data
Fixation Data, Gaze Data and Custom Events on Dynamic Objects can be aggregated across multiple Session. This requires that a Scene has a list of all Dynamic Objects that can appear. In Dynamic Object Manager Window (above), press Upload Dynamic Object Ids to Session Replay for Aggregation.
If you add new Dynamic Objects to your level, you should repeat this step.
![]() If you have a question or any feedback about our documentation please use the Intercom button (purple circle) in the lower right corner of any web page or join our Discord.
If you have a question or any feedback about our documentation please use the Intercom button (purple circle) in the lower right corner of any web page or join our Discord.